
Just Over Here Fabricating Deities
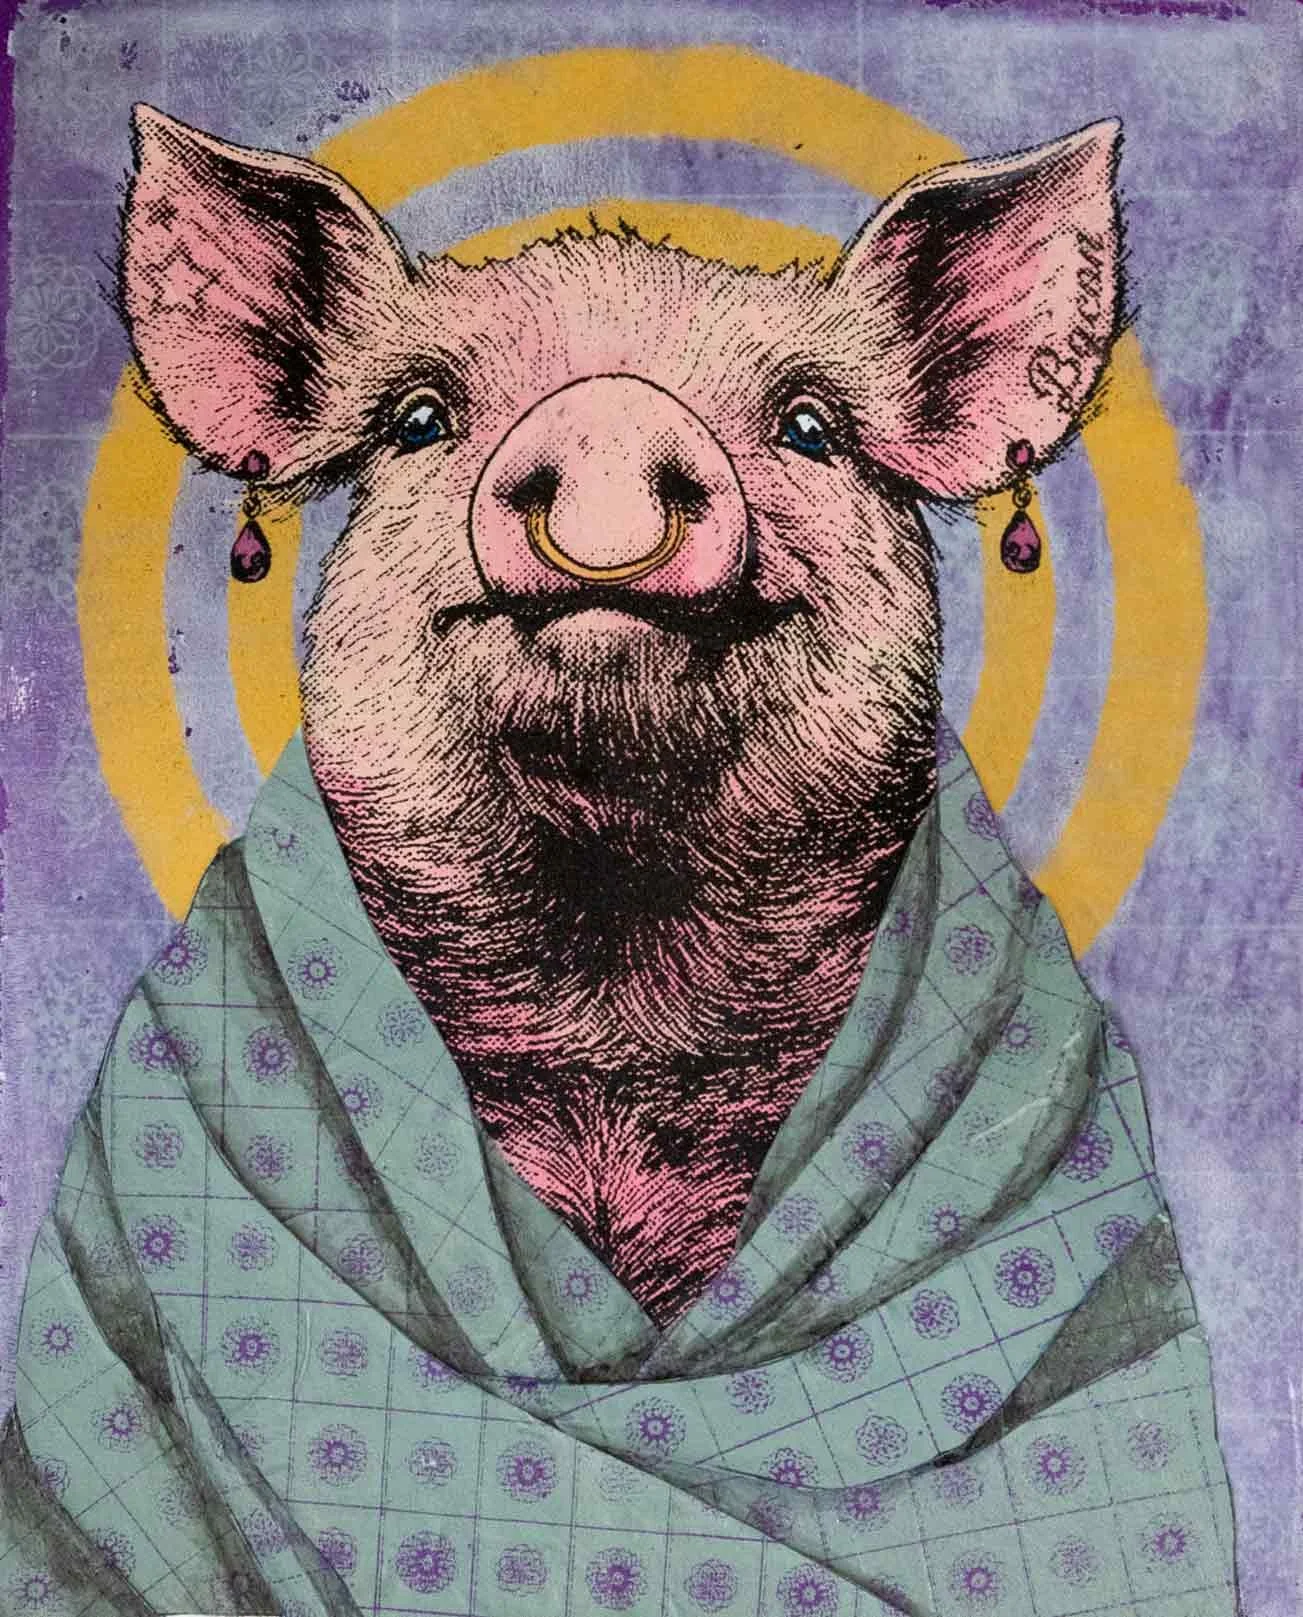
The finished goddess.
Materials
Gelli Arts 8” x 10” Gel Plate
Liquitex BASICS paint
Folk Art Metallic Acrylic Paints
Strathmore Acrylic Paper (400 gsm)
Tea Bag Paper
Liquitex Matte Gel Medium
HP LaserJet Pro M402N & plain computer paper
Cricut Explore 3
7.5MIL Mylar
Photoshop
Paint brushes, a sponge brush, brayer, heavy book, patience (or a cocktail)
This blog accompanies a short video. Here is the Instagram link.

A partially painted pig.
Making Acrylica: The Patron Saint of Gel Printers
For this process, I used three 8” x 10” Gelli Arts gel plates simultaneously. One would’ve done the job, but I needed to speed things up.
The pig, “Acrylica”, started as a sketch on paper, but was refined in Photoshop (hence her symmetry), and converted to halftone dots. I’m a sucker for halftones because they print cleaner. I ran the print through my LaserJet twice to build up toner and transferred the image to the gel plate using Mars Black (Liquitex Basics). If you’re unfamiliar with image transfers, I’ve got a detailed guide here.
Once the transfer dried, I propped the plate on an easel and rolled out a layer of gel medium. As it dries, the gel medium adds a slight texture, creating a little “tooth” that makes reverse painting easier and less streaky. Then, it was time to paint in reverse. The closest focal points go down first (like her nose ring), with layers of color building up (and on top) after that. Once she was fully painted, I sealed the silhouette with white paint to build opacity. No streaks, no background peaking through.
The Two Other Gel Plates
While Acrylica dried, I shifted gears. I wanted an ornate backdrop and wrap for her, so I dove into the Smithsonian’s Open Access library, it’s an endless treasure trove of copyright-free images. I found a wonderful tile pattern that felt just right. After desaturating, tweaking the shadows, and converting it to halftones in Photoshop, I printed two versions at different scales.
Transferring these to their gel plates was a trial-and-error situation. Different colors behave differently, and sage and purple were no exception. But after a few tries, I had the look I wanted. The background pattern (sage on purple) was transferred onto Strathmore Acrylic Paper, while the wrap (purple on sage) went onto tea bag paper. I love working with tea bag paper as it wrinkles just enough to mimic the feel of fabric, perfect for her shawl.

The image I chose from the Smithsonian’s Open Access library, before and after editing.
Enter the Cricut... and a Problem
Next, I needed to create Acrylica’s gold aura. I designed a stencil in Photoshop & used my Cricut to cut it from 7.5MIL Mylar. I employed a foam brush and some gold paint to get the halo onto the gel plate (painting it in the end puts it behind the pig). I built up the layers slowly, letting each dry between applications to avoid streaks.
At this point, I hit a snag. My background was really dark. I worried that the black halftones around Acrylica’s edges would disappear once I transferred her on top of it. So, I took a bold (untested) leap! I mixed a little Transparent Mixing White (Liquitex Basics) into my matte gel medium. My hope was that it would lighten the background without dulling the tile design. Fingers crossed.
The Moment of Truth
I transferred Acrylica onto the background, weighed her down with some heavy books, and left her to dry for 18 grueling hours while I stressed about the choice of Transparent Mixing White..But, while I stressed, I tackled the tea bag paper. I had already mapped out how I wanted the “fabric” to drape, so I imported those shapes into Cricut Design Space. But Cricut and tea bag paper? A disaster. It shredded the paper. So, I pivoted, and I used the Cricut to draw the shapes so I could cut them out by hand.

My mockup, without numbering the pieces I would have been lost!
Eighteen Hours Later
I peeled back the gel plate. Acrylica sat perfectly in place, the background beautifully weathered and just transparent enough to see the “tiles”. As if she’s perched herself in a fabulous old building.
Now I could work on arranging those “fabric” cutouts. I slowly placed them one-by-one, referring back to my mockup to put this puzzle back together. I also added some shading as I went, using watered-down Ivory Black, sunlit our Goddess was done.